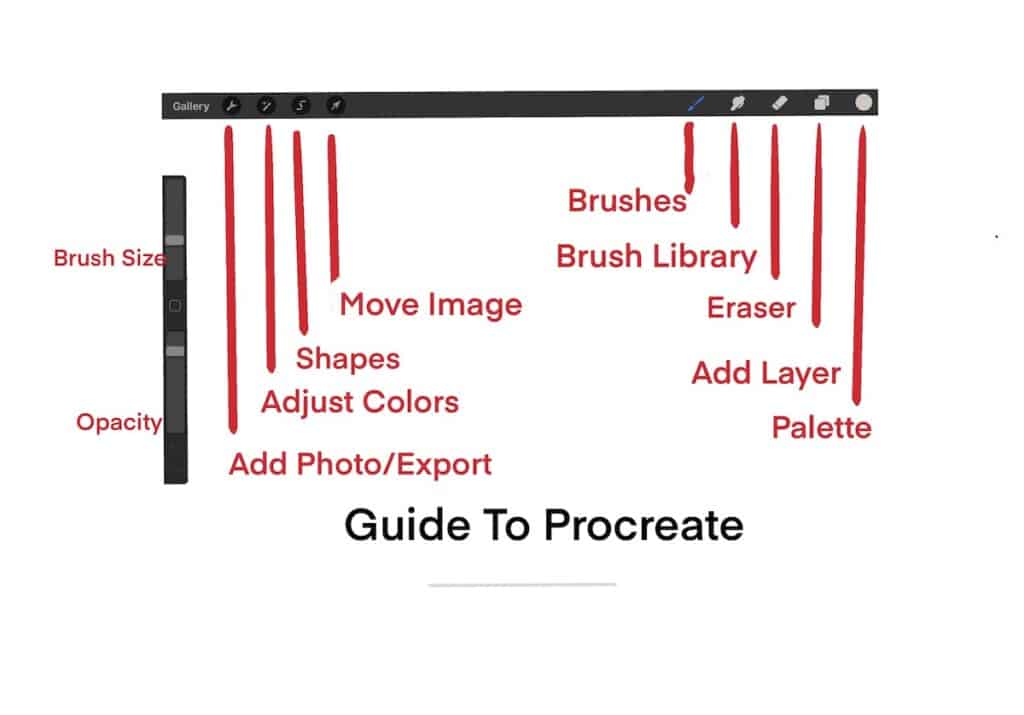
Procreate is an App that is on the Apple Ipad. We really love how powerful this App is and how it can be used to design Home Decor Accessory Product Designs.
We have outlined 10 easy steps to help you design home decor accessory products in Procreate. If you follow these 10 basic steps then you can design some great home decor accessories by using the Procreate app.
Table of Contents
- Watch Our Procreate Video
- 10 Steps To Help You Design Home Decor Products With Procreate
- Step 1 – Find The Shape You Want to Modify
- Step 2 – Select a Canvas Size
- Step 3 – Import Photo
- Step 4 – Adjust The Size Of The Photo
- Step 5 – Add A Layer
- Step 6 – Set the Correct Procreate Pen or Pencil
- Step 7 – Trace The Shape
- Step 8 – Fill In a Color
- Step 9 – Repeat Steps to Add Layer, Trace, and Fill the Color
- Step 10 – Do Clipping Mask
- Frequently Asked Questions
- Related Questions
Watch Our Procreate Video
You can also watch our video to see how we design a mirror using Procreate. You can view it by clicking on the link below.

10 Steps To Help You Design Home Decor Products With Procreate
Each of the ten steps is listed below in the order of what we do when we are looking to design a new Home Decor Accessory item.
Step 1 – Find The Shape You Want to Modify
One of the easiest ways to work with Procreate is to find the shape you want to modify for your design. We do not copy these shapes, but we will use them as a guide for our design.
This is a significant part of Procreate because you can easily modify any shape in the Procreate app. This helps you to cut down on the time you need to design, sometimes entirely from scratch.
Also, if you want to modify a design in your collection, you can just import that design or a photo of that design. Procreate makes it very easy to change and modify designs you already.
Step 2 – Select a Canvas Size
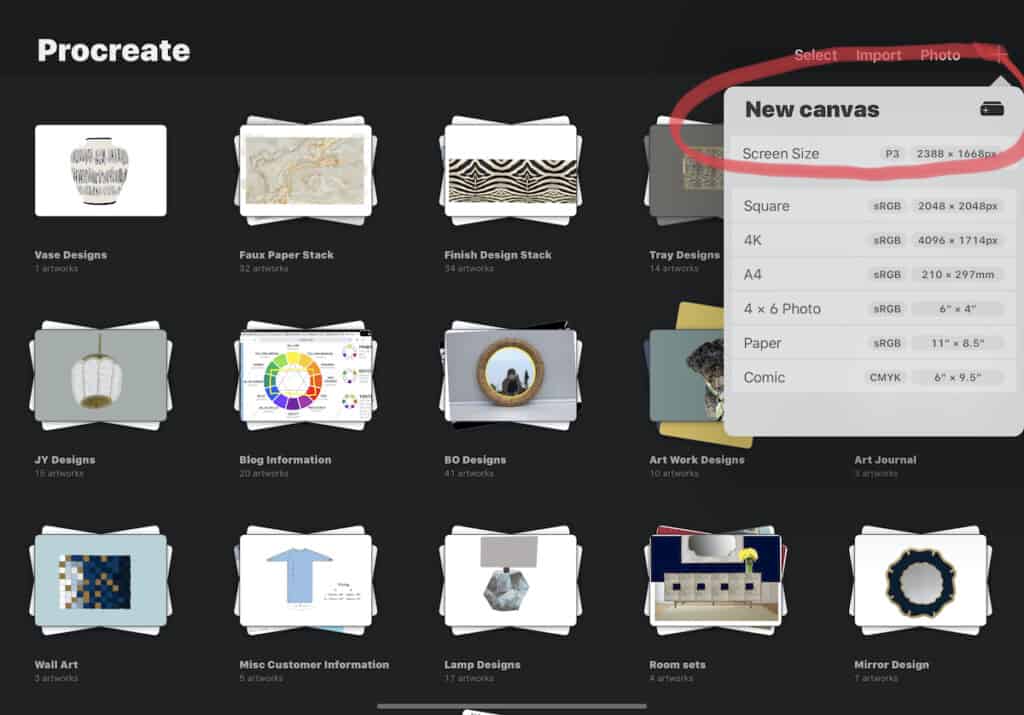
Once you have found the photo or shape you want to modify, you can select the screen size on Procreate. I will generally use the screen size canvas, but you can decide if you want a specific canvas size or if the screen size is enough for you. Procreate will offer to you a variety of canvas sizes.
You can find the canvas sizes by pressing the plus button at the top of the Procreate gallery. A menu will drop down that will give you all the sizes that Procreate has to offer for their canvas sizes.
If you do not find the size that you need, Procreate also allows you to set a custom size for any canvas size you need. I have seen in most of my design work that the screen size usually works fine for what I need. But you can decide what is best for your own design needs.
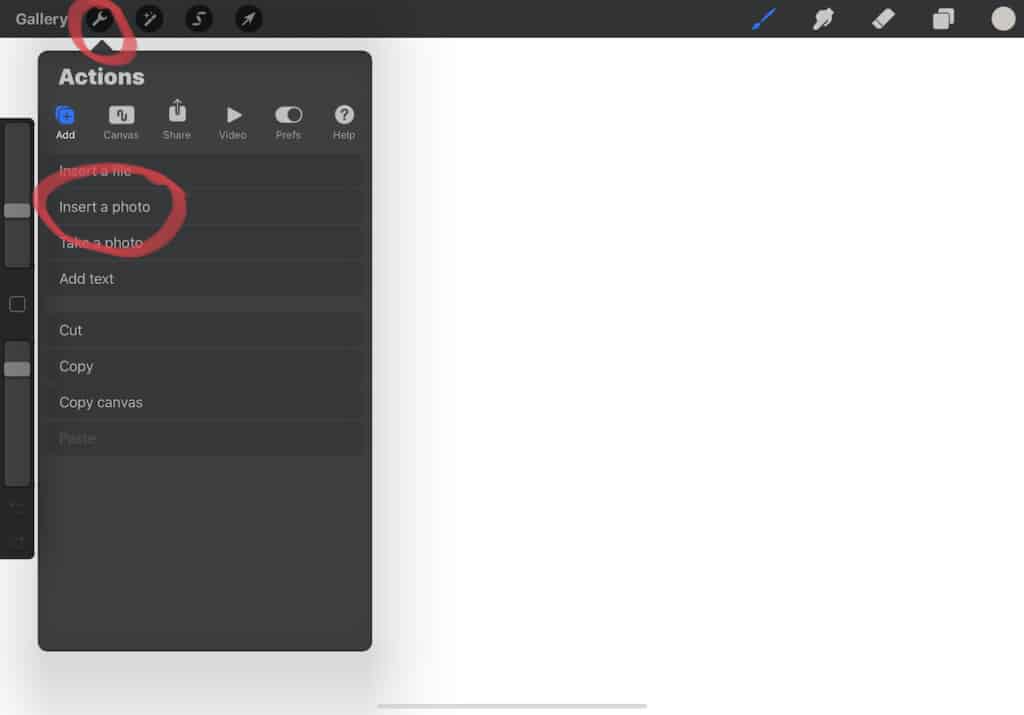
Step 3 – Import Photo
Now that you have decided on your canvas size, you can import the photos onto your canvas. You will see that there is already a background layer. This background layer will remain the background layer for the design.
The default color of the background layer is white, but if you want to change it, you can change it to another color. I have had to change the background color a few times to a light grey if I am working with a white design. But you can decide the best color for your own background color.
Import the photo of the shape you want to modify as a photo into Procreate. If you look at the layers, you will see that it has already automatically gone onto the 2nd layer.
Step 4 – Adjust The Size Of The Photo
You can now adjust the photo size as it is in Procreate and on your canvas. To adjust the size of the photo, do the following:
- Make sure you are on the right layer – To adjust the size for the photo, you must make sure you are working on the correct layer. You can only change things in Procreate on the layer you are on.
- Press the blue arrow button – To adjust or move the layer, you must be sure that the blue arrow button is pressed at the top left-hand side of the screen. When pressed, you can adjust the size of the layer you are on.
- Pinch using both fingers – The easiest way to adjust the layer is to pinch with both fingers on the screen. This will allow you to move the layer in any direction or size you want to adjust it. Make sure you change it to the size that you will be able to work with. You usually do not want to adjust this layer, but keep it the size.
- Turn off the blue arrow button – Once you have the photo in the size and position that you need for your design, then you can turn off the blue arrow to lock the photo in place on that layer.
Step 5 – Add A Layer
You will want to work in layers when working in Procreate for designing. This means that every single part of a design should have a new layer. The reason for this is that it will make it much easier to put in the finish on the design when you are completed with the home accessory product design.
One mistake that many people make when working with Procreate is they will put everything on one layer and wonder why their clipping mask or other functions do not work correctly. You must layer each side or part of the item you are designing.
For example, if I am designing a box, each side of the box will have its own layer. The hardware will have its own layer. Any part of the box will have its own individual layer.
Step 6 – Set the Correct Procreate Pen or Pencil
Now, you are ready to start to trace the shape onto the first layer. When tracing the shape, especially when designing home decor accessories, you need to be sure to use the correct Procreate pen or pencil. To find out more about the ones we suggest, you can read our blog on What Procreate Pens or Pencils to Use Procreate’s Clipping Mask Function? by clicking here
In this blog, we have a video to show you the pens and pencils we recommend for clipping masks. You can see that some of them work better than others.
You can also watch our video below, where we demonstrate this.
Step 7 – Trace The Shape
Now, you can trace the shape onto the layer you just created. Procreate will help you draw straight lines, adjust a box, or adjust corners to fit a box or shape. This means you do not need an exact shape; you can adjust it after drawing it. Hold the pencil down on the screen, and it will automatically straighten out.
If you are drawing a box or another shape, you need to be sure the box or shape is completely closed. If any areas are not closed, you can not fill it with the color for the next step. If your lines are not filled enough, you cannot use the clipping mask function for the box.
Step 8 – Fill In a Color
You are now ready to fill in the color to the shape you just traced. At this point in the design, I do not worry too much about what color I am using but will use any color. I will usually use a different color for each side of the box and each shape I have drawn so when I do the clipping mask function, it is easy for me to see what layer I am on.
As I am also using the clipping mask function, I do not worry so much about the color of the pen or pencil I have used and instead will use a bright color many times. This color will not show in the final design if I use the clipping mask function.
To learn more about clipping masks, read our blog and watch our video on 4 Easy Steps to Using the Clipping Mask Function in Procreate by clicking here.
Step 9 – Repeat Steps to Add Layer, Trace, and Fill the Color
Now, you need to repeat the steps to add the layer, trace the shape, and then fill in the color as many times as you need. Many times, when I am doing something that can be complicated, I may have close to 30 or more layers. So it just really depends on your design and how many layers you will need for the design.
Step 10 – Do Clipping Mask
The final step of my Procreate design is for me to do the clipping mask function. Now that my design is completely drawn out and I have filled in the colors for the shape, I am ready to do the clipping mask function.
I have found that importing a color chip or color into Procreate can help make your design look real Also, if you are looking for a specific color or finish, it will help you to be able to see how that color or finish will look on a completed design prototype.
To learn more about the clipping mask function, you can check out our blog on clipping masks and why we find this a great feature of Procreate for home decor and home furniture design. Our blog is 4 Easy Steps to Using the Clipping Mask Function in Procreate you can find out more and watch our videos on this by clipping here.
You can also watch our video to see how we use the clipping mask function by clicking on the link below:
The basic steps for clipping mask are:
- Add a Layer – You must add a layer directly above the shape you want to clip the mask.
- Import the Photo – Import the photo of your finish on the layer you want to clip the mask.
- Press Clip Mask – Highlight the layer so it is blue., then a menu will appear on the left side; press clipping mask. The photo will clip into the shape of the layer below it.
Once your clipping mask is done you can export the image to a jpeg or a host of other formats so that you can share it with others. Procreate has a very easy share function on the screen’s left side, allowing you to share designs in various formats.

We love to use Procreate as it is a simple yet easy solution for designing home decor and home furniture products and accessories. Almost anyone can learn to use Procreate to design unique products.
Find out more about how Mondoro can help you create, develop, and manufacture excellent home decor and furniture products – don’t hesitate to contact me, Anita. Check out my email by clicking here or become a part of our community and join our newsletter by clicking here.
Mondoro gives out a FREE Lookbook to anyone interested. You can receive a copy of our latest Lookbook by clicking here.
Listen to our Podcast called Global Trade Gal. You can find it on all major podcast platforms. Try out listening to one of our podcasts by clicking here.
Subscribe to our Mondoro Company Limited YouTube Channel with great videos and information by clicking here.
Frequently Asked Questions
What is Procreate, and why is it suitable for designing home decor accessories?
Procreate is a powerful digital illustration app available on the Apple iPad. It offers an extensive range of tools and features that make it ideal for creating intricate and visually appealing designs for home decor accessories.
Do I need any prior design experience to use Procreate for home decor product design?
No, Procreate is user-friendly and suitable for users with varying levels of design experience. The intuitive interface and helpful features make it accessible for beginners while offering advanced tools for experienced designers.
What are the key features in Procreate that can enhance home decor accessory designs?
Procreate offers features like customizable brushes, layers, blending modes, and precise selection tools. These features allow you to create intricate patterns, textures, and detailed designs for your home decor accessories.
Can I import my own images or patterns into Procreate for my designs?
Yes, Procreate allows you to import and use your own images, patterns, or textures. This feature enables you to personalize your designs and incorporate unique elements into your home decor accessory projects.
How can I ensure my designs are proportionate and accurate?
Procreate provides tools like the Drawing Guide and the Symmetry tool, which help you maintain symmetry and accuracy in your designs. These features are particularly useful for creating balanced and aesthetically pleasing home decor accessories.
Can I export my designs from Procreate for further editing or sharing?
Yes, Procreate allows you to export your designs in various formats, including PSD, JPEG, PNG, and more. This flexibility enables you to continue refining your designs in other software or share them with collaborators or clients.
Are there any specific brushes or tools in Procreate that are ideal for home decor designs?
Procreate offers a wide range of brushes, and you can find or create brushes suitable for different textures and effects. Experimenting with brushes like textures, foliage, or pattern brushes can enhance your home decor accessory designs.
How can I use layers effectively in Procreate for my home decor designs?
Utilizing layers in Procreate allows you to work on different elements separately. This makes it easier to manage details, experiment with variations, and make adjustments without affecting the entire design. Understanding layer management is crucial for creating complex home decor accessory designs.
Can Procreate be used for 3D designs or only 2D designs for home decor accessories?
Procreate is primarily a 2D design tool. While it doesn’t support 3D modeling, its robust set of 2D features, textures, and brushes provide ample capabilities for creating detailed and visually appealing 2D designs for home decor accessories.
Are there any online resources or communities where I can learn more about using Procreate for home decor product design?
Yes, there are many online tutorials, forums, and social media groups dedicated to Procreate. Platforms like YouTube, Procreate’s official forums, and social media hashtags (#ProcreateDesign) are great places to find tutorials, tips, and connect with other designers for inspiration and advice.
Related Questions
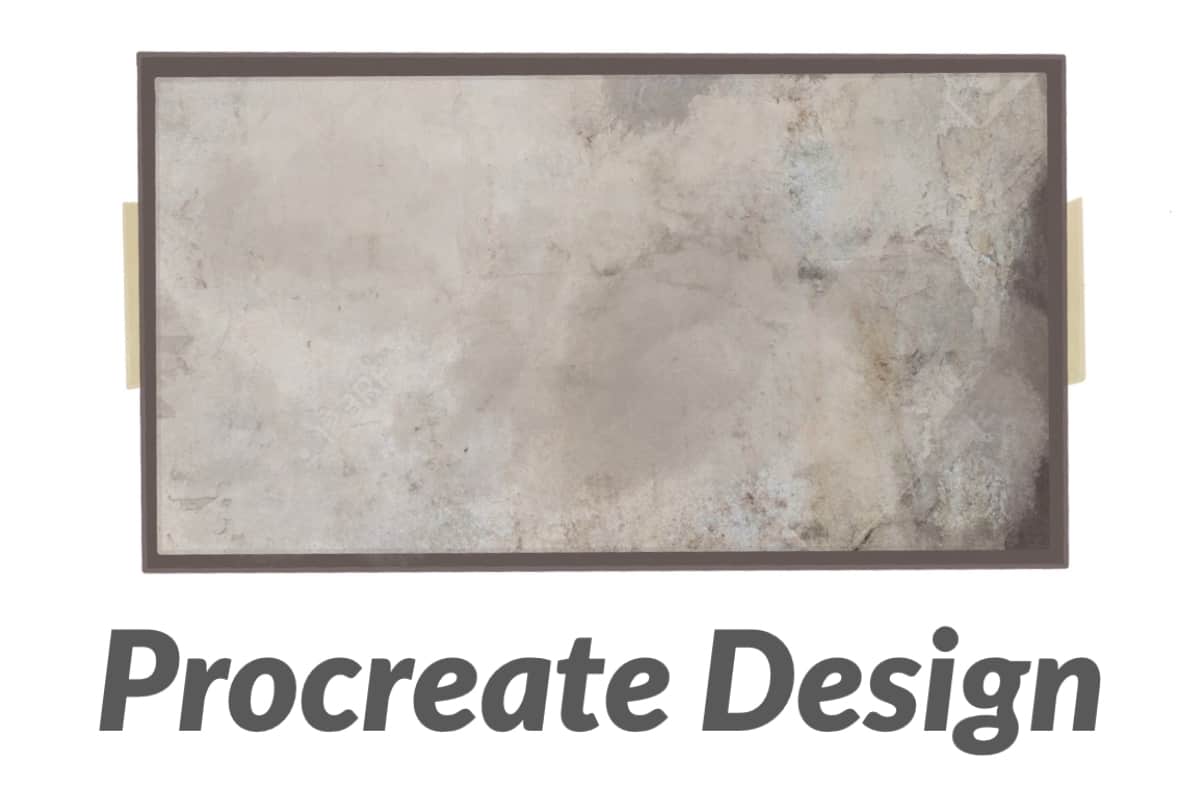
How To Design A Home Decor Accessories Tray In Procreate?
Designing a home decor accessories tray in Procreate can be very easy if you follow our 4 simple steps and instructions 1) find a tray shape to use as a reference photo, 2) import the photo into Procreate., 3) add layers in Procreate for each tray part, and 4) use the clipping mask function.
You can read more about how to design a home decor tray in Procreate by reading our blog 4 Easy Steps to Design a Home Decor Accessories Tray in Procreate by clicking here.
Why Use Procreate To Design Home Decor Products?
Procreate is a very easy design program to learn with a lot of great design functions. Using Procreate can help to save you time and money for your home decor and home furniture design needs. It will allow you to set up trend colors in your design palettes so you can easily find them again. You can also make repeat patterns and use the clipping mask function to get a design looking very close to the finished product.
To discover more about Procreate you can read our blog on Using Procreate In Designing Home Decor Products – Why We Love It! by clicking here.