Procreate is a great tool to use for product design. We love to use it for our home decor and home furniture designs. One Procreate function we find extremely useful is the clipping mask function.
The clipping mask function on Procreate allows the top layer to be clipped or cut to the same size and shape as the bottom layer. This function allows you to see in more detail how a product will look when actually completed. The first thing you must do is make sure the photo or file you import is adequately prepared. Then, you must complete the product design while being sure to layer and fill in each layer with color. Once the design is completed, you are ready to do the clipping mask and clip the top layer to the bottom layer.
Table of Contents
What is Clipping Mask?
The clipping mask function is used in Procreate and other design programs like Adobe Photoshop. A clipping mask can best be described as one layer placed on the top of another layer, and then the top layer is clipped or cut to fit the bottom layer’s size.
In other words, the bottom layer is like the pattern, and the top layer goes on top of the bottom layer, and the top layer will get cut to the size of the bottom layer. If you think of clipping masks in terms of individual layers and the top layer getting cut or clipped onto the bottom layer, this will help you understand more about what a clipping mask in Procreate is about.
To work with the clipping mask function, you must consider your bottom layer’s size and shape and the top layer, the clipping mask layer. The clipping mask layer must fit or be clipped or cut into the same size and shape as the bottom layer.
Why Use the Clipping Mask with Procreate?
Procreate’s clipping mask function is really a great function to use for home decor and home furniture product design. Here are some of the reasons why we love the clipping mask function in Procreate and use it a lot in our design work:
- Finishes you cannot get otherwise. – For some finishes, you cannot get the finish unless you import a photo of the finish. I find this to be true for metal finishes such as brass. To get a true brass finish, I must use the clipping mask function. Also, some lacquer, such as gold or silver leaf or a specific pattern that I want.
- Saves you time – I find that using the clipping mask method saves me a lot of time.
- One design – many finishes – Procreate’s clipping mask function allows you to have one design, and then you can insert many different kinds of finishes into one design. This allows you to see how a product will look with many different finishes. This is a great time-saving tool.
Video: How to Use the Clipping Mask Function on Procreate
To see a step by step tutorial on How to Use the Clipping Mask Function on Procreate for home decor and home furniture design, you can click on the video below.
Procreate is really a great program to use for product design. We love it so much because you can basically take a pattern or design and then put it on a variety of items and color finishes to see what finish will work best.
Step 1: Preparations to Use Clipping Mask
Here are a few preparation steps that you need to take to use procreate:
- Photograph The Finishes – Before you can use the clipping mask function, you need to have good photographs of the finishes you will use. If you are not using a photograph, you need to have a Jpeg or another kind of file to import into the Procreate program. Procreate allows you to import a file or photo or use the camera on your iPad to import a photo into Procreate.
- Adjust and Crop the Image – Before working with an image in Procreate, it is best to adjust and crop the image. You want the image to be as clean as possible and not have any extra white or other space. This way, you will see exactly where and how you are clipping the top layer on top of the bottom layer.
- Organize the images into Albums – We have found with Procreate and their clipping mask function that it is easier if you have all your photos organized into albums so that you can find it easier. Doing this now will save you a lot of time in the long run.
To find out more about how to set up repeat patterns in Procreate, you can read our blog entitled 6 Easy Steps to Use Procreate to Make A Pattern Repeat by clicking here.
You can also watch our video tutorial called Using Procreate to Make a Pattern for Your Design by clicking on the link below:

Step 2: Design The Product
The next step is to design the actual product you want to use the clipping mask with. Here are a few things you can do for this step:
- Design the Product. – If you need to design the product in Procreate. You can sketch it out just like you would if you were using a sketch pad.
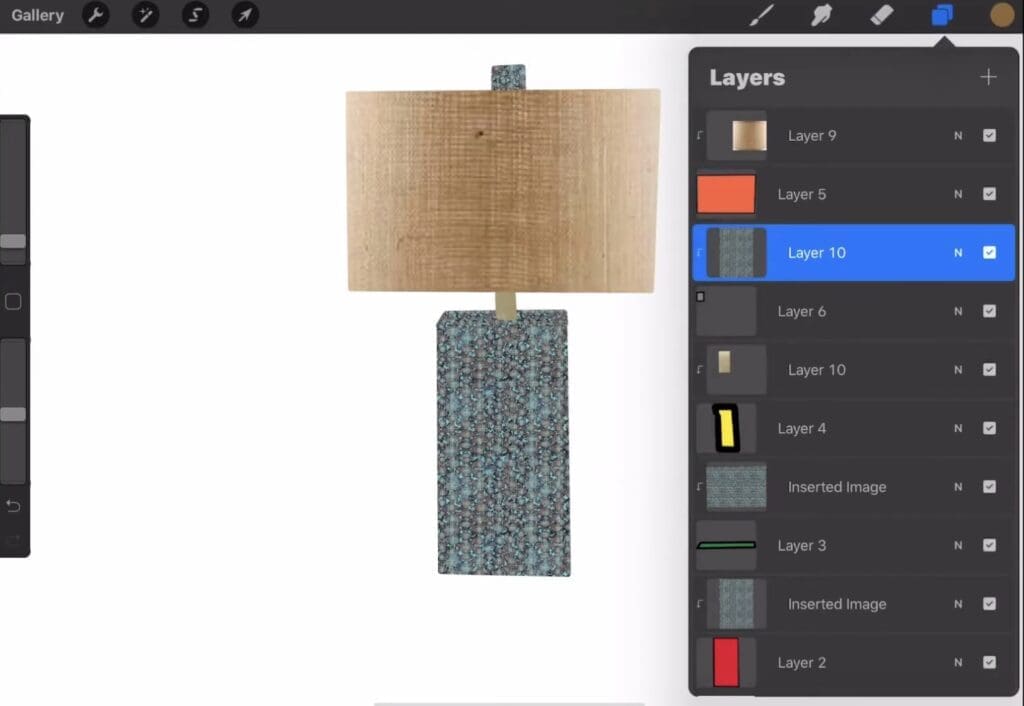
- Build the Design Using Layers – When designing with the Procreate clipping mask function, you must keep in mind the layer function in Procreate. This means that each element of the design should have its own layer. The reason is that the clipping mask must go on top of each of these layers. So if you are sketching the design out by hand, you must also think about the layers you are sketching the design.
Layers are one of the most important things for you to understand when you are working with Procreate. Each element must have its own layer, or you cannot properly use the clipping mask function. That is why we always have one design element on one layer when we are designing a product.
Step 3: Fill in the Layers
Once your design is completed, you need to make sure each layer is filled with a color. Here is some information about the color filling the layers:
- Fill the layers – There are several ways you can use the clipping mask function. One is if you want the pattern or color to fill the entire layer. For it to do this, the layer you want must be completely closed. For example, if you have a box you want to fill in, then that box must be completely sealed without any open areas or cracks. If the box is not filled in, you cannot add a color fill to the box shape. You can test this by trying to fill the box with a color. This is why we design an object that we know we want to fill in completely; we will fill the layer first with a color. (For more information on this, please see our video instruction above).
- Draw a Pattern – You can also draw a pattern on one layer and then use the clipping mask to put a finish on top of the pattern you have drawn.
When working with layers, do not worry about the color you have filled into the layer. We have found that having different colors for each layer makes clipping easier, especially when working with many different layers. I often use really bright colors for each layer so that I can clearly see what layer I am working on when I am doing the clipping mask.
To see how the clipping mask function was used to add gold leaf to a pattern, you can view our video called Procreate – How to Add Golf Leaf to a Design Pattern by clicking on the link below.
Step 4: Clip Mask the Layers
Now that your layers are all completed and all your color fills, you are ready to do the actual clipping mask. Here are the steps you need to take to complete the clipping mask on Procreate:
- Go to the layer you want to do the clipping mask on – Go to the layer you want to do the clipping mask.
- Add a layer on top of the first layer – Then add a layer on top of that layer.
- Import a Photo. File or Take a Photo – Now you are ready to import a photo, file, or take a photo, and import it onto the layer you just added.
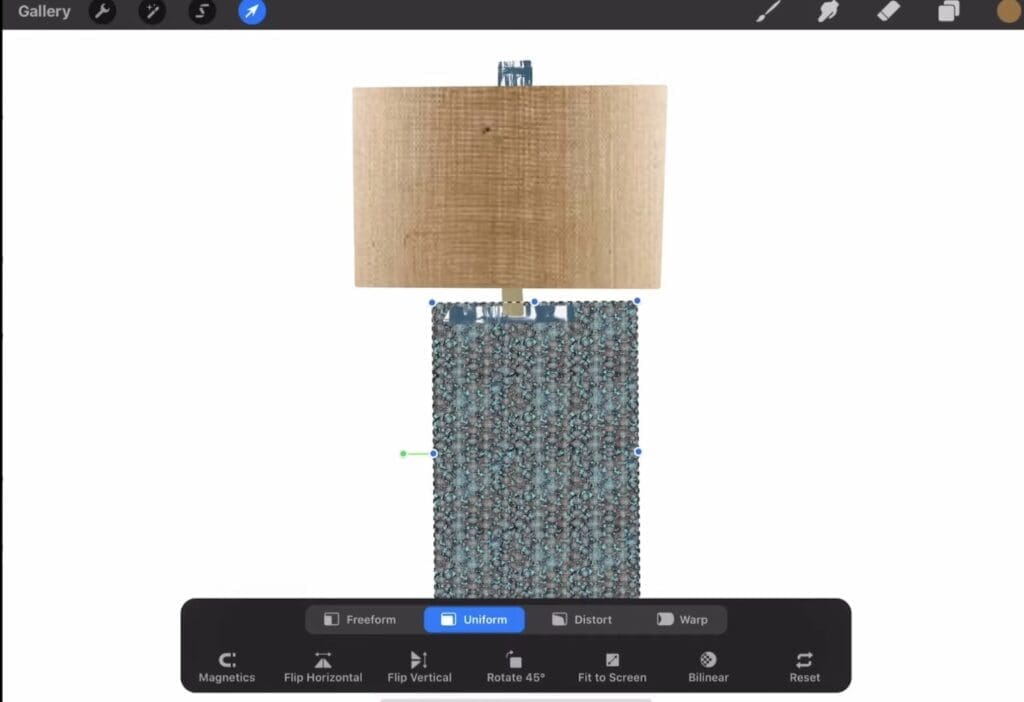
- Adjust that layer – Using your two fingers, make sure you size the clipping mask layer photo to the size and position you want on the bottom layer. As you cannot see the bottom layer completely, you may need to use your judgment on this.
- Do clipping mask – Press on the left-hand side of the top layer. A drop-down menu will appear. Then click or press on the clipping mask, and the top layer should clip or cut into the bottom layer’s size.
To view full instructions on this, you can view the above video called Clipping Mask – Using in Procreate. This shows how we do the clipping mask in Procreate.
We really love to use the clipping mask function for our home decor and home furniture product design. We find it a great way to get an actual look and feel for our designs.
Find out more about how Mondoro can help you create, develop, and manufacture excellent home decor and furniture products – don’t hesitate to contact me, Anita. Check out my email by clicking here or become a part of our community and join our newsletter by clicking here.
Mondoro gives out a FREE Lookbook to anyone interested. You can receive a copy of our latest Lookbook by clicking here.
Listen to our Podcast called Global Trade Gal. You can find it on all major podcast platforms. Try out listening to one of our podcasts by clicking here.
Subscribe to our Mondoro Company Limited YouTube Channel with great videos and information by clicking here.
Frequently Asked Questions
What is the Clipping Mask Function in Procreate?
The Clipping Mask Function in Procreate is a feature that allows the top layer of your design to be clipped or cut to the same size and shape as the bottom layer. This is particularly useful for getting a detailed preview of how your product will appear when finished.
Why is the Clipping Mask Function Useful for Product Design?
The Clipping Mask Function is essential for product design in Procreate as it enables you to closely examine the details of your design by overlaying layers. It provides a more accurate representation of the final product.
What Steps are Involved in Using the Clipping Mask Function?
Firstly, ensure that the imported photo or file is appropriately prepared. Then, proceed with the product design, creating and layering each element with color. Finally, when the design is completed, use the Clipping Mask Function to clip the top layer to the bottom layer.
How Should I Prepare the Photo or File Before Using the Clipping Mask Function?
Before applying the Clipping Mask Function, make sure the photo or file you import is properly prepared. This involves ensuring that it is in the right format and resolution, and any necessary adjustments are made for optimal design outcomes.
Can I Use the Clipping Mask Function for Specific Design Elements?
Yes, the Clipping Mask Function can be applied selectively to specific design elements. It allows you to focus on particular aspects of your design, providing a more nuanced view and helping in refining specific details.
Are There Any Limitations to the Clipping Mask Function in Procreate?
While the Clipping Mask Function is a powerful tool, it’s essential to note that it operates within the confines of the layers you’re working with. Understanding layering techniques and structure is crucial for maximizing the effectiveness of this feature.
Can I Undo the Clipping Mask Function Once Applied?
Yes, the Clipping Mask Function is reversible. If you wish to revert to the original layers, you can undo the clipping mask. This flexibility allows for experimentation and adjustments throughout the design process.
Does Using Clipping Masks Impact the File Size in Procreate?
Applying Clipping Masks generally doesn’t significantly impact file size in Procreate. The function is more focused on visual representation within the design layers rather than altering the overall file size.
Is the Clipping Mask Function Exclusive to Procreate?
While the term “clipping mask” is commonly associated with Procreate, similar functions exist in other graphic design software. However, the specific steps and interface may vary, so it’s recommended to refer to the user guide of the respective software.
How Can I Learn More About Advanced Techniques with Clipping Masks in Procreate?
To explore more advanced techniques and features related to Clipping Masks in Procreate, consider referring to Procreate tutorials, online courses, or community forums. These resources can provide insights into creative applications and tips from experienced users.
Related Questions
How Do You Set Up Color Palettes in Procreate?
The Procreate App for Apple IPad has a palette feature that easily sets up color palettes. This is a great tool that helps you organize the colors you need when designing products by Procreate. The palette tool will organize the palettes and show you the RGB, HSB, and Hexadecimal Value of your color, along with the exact position of the color on the color wheel. You can use several methods to find your palette colors, but one of the easier ones is to photograph the color and import the photo into Procreate.
You can find out more about color palettes by reading our blog Setting Up Your Color Palettes in Procreate, What You Need to Know by clicking here.
Why Use Procreate for Home Décor Accessories Designing?
Procreate is a powerful Apple app with many Photoshop features, but it is more user-friendly than Photoshop. Procreate allows you to design a home decor accessory item, and then with a few quick adjustments, you can quickly view the same product in a variety of finishes and colors. Procreate is very user-friendly and is a tool that can help any home decor designer, interior designer, importer, and manufacturer.
You can find out more about how to your Procreate for home decor and home furniture product design by reading our blog Why Use Procreate for Home Décor Accessories Designing? by clicking here,