Photoshop has established itself as an indomitable force in photo editing and graphic design with its diverse range of tools and features. Among its multiple offerings, the clipping mask plays a versatile role. Clipping masks are a powerful tool that brings sophistication and professionalism to your work. This tool can transform your designs significantly, enabling the user to create unique visual backgrounds, logos, and more.
However, mastering this tool necessitates proper guidance and understanding, which we aim to cater to here. From beginners to advanced Photoshop users, this essay is an all-exploring tutorial on mastering clipping masks. It will provide an overview of clipping mask fundamentals, when and how to utilize them effectively in your projects, advanced techniques, and troubleshooting common issues. So, let’s dive into the world of clipping masks and unlock its possibilities.
Table of Contents
- Definition and Fundamentals
- Creating and Applying Clipping Masks
- Advanced Techniques with Clipping Masks
- Troubleshooting Common Issues
- Related Content
Definition and Fundamentals
Unveiling the Power of Clipping Masks in Adobe Photoshop: A Game-Changer in Digital Art
In digital art and graphic design, Adobe Photoshop is an indispensable tool, fostering creativity and turning visions into stunning visual reality. As technology enthusiasts, the constant exploration of sophisticated features such as the Clipping Mask unravels new realms of innovation.
Let’s dissect the notion of the ‘clipping mask’ in Photoshop without ado and fathom why it shoulders such significance.
A clipping mask is essentially a digital art maneuver that allows one layer’s content – the ‘masking layer’ to define the visibility bounds of the content belonging to the layer(s) above it – the ‘base layer.’
Think of it as a window through which you can view the artwork exclusively within its defined shape or boundaries.
But why does this feature matter? What makes the Clipping Mask so instrumental?
It propels artistry and image manipulation to unexplored heights, introducing unparalleled flexibility in managing layers. Control rests solely in the hands of the digital artist, enabling the concealment, exposure, or repositioning of strategic elements of the artwork without permanently modifying layer content.
The clip-to-layer relationship renders non-destructive image handling. Border changes of the underlying masking layer are reflected automatically in the base layer.
This non-permanent nature of manipulations fosters room for experimentation and breeds creativity, making a designer’s life undeniably simpler.
The Clipping Mask is pivotal in creating texts filled with images or patterns to generate graphic overlays. Eye-catching Instagram posts, chic marketing collateral, and aesthetic website graphics—look closely, and the magic of Clipping Masks can be found everywhere.
Efficiency matters in the digital world, and Clipping Masks are a testament to this rule. Infusing artwork with a unique style in a few steps is an incredible power to wield, making this feature a personal favorite among graphic designers and digital artists.
In the grand scheme of technological advancements, features like the Clipping Mask may seem minuscule; however, it is revolutionary for those engrossed in visual storytelling.
After all, digital art and design aren’t merely about creating imagery. It’s about solving problems, enhancing workflow efficiency, expanding creative possibilities, and painting a mesmerizing digital canvas with tools like Adobe Photoshop leading the way.
Creating and Applying Clipping Masks
After the foundations have been laid on clipping masks and their relevance in graphic design, the next step is creating and applying them in Photoshop. For those keen on enhancing their digital art prowess, this step-by-step guide will be a vital tool in their technology arsenal.
Creating a clipping mask is not a complicated process; instead, it is a systematic process that requires keenness to observe every minor detail.
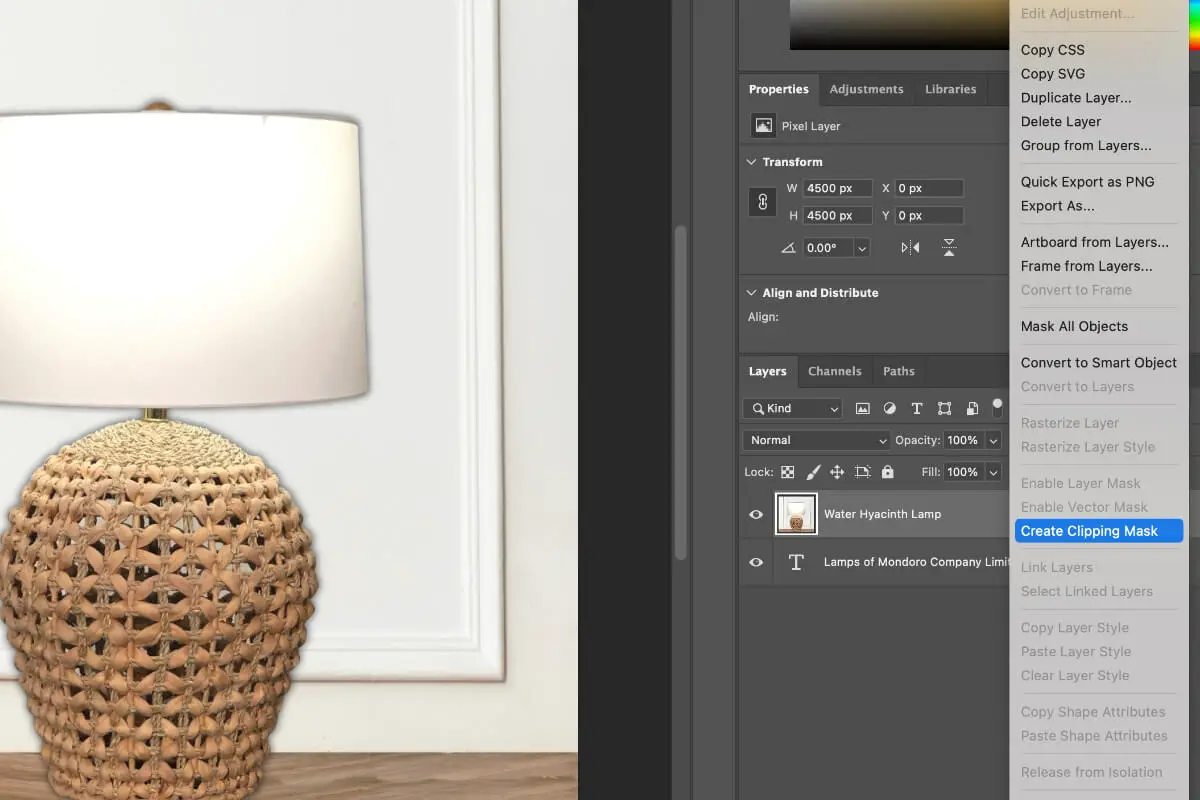
With Adobe Photoshop open, the first course of action is to ensure at least two layers are present. The bottom layer becomes the base layer upon which the mask will be applied, and the layer immediately above it will serve as the mask layer.
Select the mask layer to create an essential clipping mask, then navigate to the “Layer” option on the top menu. A dropdown list will appear. From there, choose “Create Clipping Mask.”
A clipping mask has been established. Furthermore, Photoshop lets one see the applied mask in the Layers Panel. One notable attribute is that the mask layer indents to the right, further accompanied by an arrow pointing downwards towards the base layer.
Applying a clipping mask is just a step away after its creation. With the above steps followed religiously, select the mask layer and use the paint tool or any other desired tool to draw over the image.
It’s fascinating how the ‘drawn over’ part only appears on the image. An ingenious way of manipulating images – whether painting within the lines or maintaining non-destructive changes.
Besides the essential clipping masks, Adobe Photoshop provides various other options to explore. Noise, brightness, and gradient are some advanced techniques whose effects can be clipped within a base layer to enhance the quality of graphics. All these rely on the same principle of creating and applying clipping masks.
In maximizing the potential of clipping masks, remember that they are not confined to single layers. A stack of layers can be clipped within a single base layer. In such a scenario, all stacking layer artwork reveals itself within the shape of the base layer. Adobe Photoshop also lets one release and move these layers around as needed.
Lastly, the natural beauty of Adobe Photoshop is its features’ versatility. If one needs to change the image within the mask, just hit ‘unlink’ to disconnect the mask from the base image. This will allow the rescaling or repositioning of the base image, independent of the mask.
If one masters the knack of creating and applying clipping masks, the layers of Adobe Photoshop become a playfield. Clipping masks bear the potential of turning ordinary images into extraordinary visual content, eliciting the curiosity of every digital art enthusiast.
This feature is a real game-changer, and any tech-savvy individual keen on automating and revolutionizing their digital art and graphic design experience ought to get their hands on it.
It is, therefore, critical for every digital art enthusiast, every graphic designer, and every tech-savvy individual to exploit and master the seemingly inexhaustible possibilities that Adobe’s Photoshop and its ever-evolving toolset, including clipping masks, offer. Don’t just design; create magic!
Advanced Techniques with Clipping Masks
Diving Deep: Advanced Techniques with Clipping Masks in Photoshop
Every digital maestro is passionate about pushing boundaries. Naturally, that extends to how we use tools like Adobe Photoshop. We’ve already covered basic to intermediate uses of clipping masks, a favorite tool of creators.
Now that we’ve established how they simplify layering, manage images, and inspire creativity, let’s delve into some advanced techniques.
Clipping masks are versatile; they allow many ways to build complex compositions, intricate designs, and even realistic paintings. Let’s start with a method that boosts the sense of depth in a piece: noise addition.
By layering a noise-filled layer on top of a base image with a clipping mask, you can create grainy textures and permeate the piece with a sense of tangibility. This technique benefits those seeking to inject a vintage look into their designs or mimic film grain.
Now, let’s take brightness to the next level. Often overlooked, blending modes within clipping masks offer huge potential. Lighten or screen blending modes can emphasize lights in a scene while darks remain unaltered.
Conversely, use darken or multiply modes to emphasize shadows and leave the highlights intact. This is particularly handy in photo editing or building complex digital paintings.
Let’s shift to gradients. Clipping masks permit gradient maps to dramatically alter the colors of an image or a section of it. This technique works wonders when color-grading an image or creating stunning backgrounds for digital illustrations or designs. They can also help create spectacular lighting effects, adding that extra pop.
Harnessing the power of multiple layers is vital in clipping masks. This approach is beneficial when working with complex images or ones with multiple elements. Instead of having separate masks for each layer, you can have one clipping mask affecting multiple layers, giving you unique control over every detail of your artwork.
The versatility of clipping masks extends to editing images within them, too. After applying a mask, each section can be edited individually without affecting the overall image. This allows precise color corrections, filter applications, or alterations in opacity, saturation, and contrast to be made to individual portions of the image. The result? A cohesive yet meticulously detailed and nuanced digital masterpiece.
When wielded by a tech-savvy artist familiar with the potential of Adobe Photoshop’s clipping masks, this toolbox can be a game changer in the digital art space. These advanced methods elevate visual creativity and, consequently, the resulting artwork – pushing beyond what was once thought possible.
Being up-to-date means knowing about such tools and, mastering these techniques and, pushing their boundaries, finding new ways to bend pixels to your will; that’s where innovation happens in graphic design. In the digital world, the only limit is the scope of your imagination and the depth of your tool mastery. Ready to dive deeper?

Troubleshooting Common Issues
Common Problems When Using Clipping Masks and How to Troubleshoot Them
While Adobe Photoshop’s clipping masks are undeniably a game-changer in digital art, users may sometimes face challenges that hinder their creativity.
This article aims to demystify the common problems encountered using clipping masks and mitigation strategies.
A common problem is the Clipping Mask not working as expected, often characterized by the adornment layer failing to adopt the shape or form of the base layer. This can be due to multiple causes. Foremost is the improper arrangement of layers.
In Adobe Photoshop, layer hierarchy matters. The base layer must be directly beneath the adornment layer. The clipping mask may not function properly if this order is not maintained.
Another frequent issue is the occurrence of unexpected colors and textures within the mask. This is usually due to the mode settings of the layers. For instance, if the blending mode is set to anything other than Normal, the final image may exhibit unexpected colors or effects. The solution? Ensure the blending mode is set to Normal unless other effects are intentional.
Perhaps the problem is stubborn transparency areas within your mask. Don’t panic; this may result from the base layer having less than 100% opacity. Adjust the opacity slider to 100% on the base layer; the transparency should no longer be a problem.
Clipping masks might seem ineffective in some cases. This often occurs when trying to clip multiple layers without a group.
The quick fix is to ensure all layers included in the mask are in one group. This action turns the group into a super-layer, which can be used effectively with clipping masks.
Toning down brightness within your clipping mask can also be problematic. The trick here is to add a Levels adjustment layer, clip to the mask, and pull down the mid-tones slider within the Levels dialogue box. This action effectively tones down the brightness within the mask, giving a balanced and aesthetically pleasing result.
Lastly, remember that the base layer must always have visible content. If most of the base layer is transparent, the adornment layer might seem to disappear, leading to confusion. The simple remedy here? Ensure the base layer has adequate visible content for the mask to display correctly.
In conclusion, mastering Adobe Photoshop’s clipping masks requires understanding its interface, features, and flexibility. Encountering problems is a part of the learning curve.
Troubleshooting these issues enhances the user experience and propels the user’s understanding of this powerful tool to new heights, opening the door to limitless creativity and efficiency in digital art and graphic design.
Tech enthusiasts and graphic designers must understand common problems associated with clipping masks to unlock their full potential. Hence, confidently harness the power of Adobe Photoshop and its versatile tool, the clipping mask.
After exploring the significance, fundamentals, applications, advanced techniques, and troubleshooting measures associated with clipping masks in Photoshop, it’s evident that it is a versatile tool that every designer should be acquainted with. While it may seem complicated at first, familiarity is obtained with practice.
The path to becoming an adept Photoshop user is paved with ample exploration and persistent practice, and mastering clipping masking is a critical milestone on this journey.
By integrating these strategies into your workflow, the transformative power of your designs could be genuinely substantial. Therefore, practice these techniques and be ready to take your graphic design and photo editing works to the next level.
Find out more about how Mondoro can help you create, develop, and manufacture excellent home decor and furniture products – don’t hesitate to contact me, Anita. Check out my email by clicking here or become a part of our community and join our newsletter by clicking here.
Mondoro gives out a FREE Lookbook to anyone interested. You can receive a copy of our latest Lookbook by clicking here.
Listen to our Podcast called Global Trade Gal. You can find it on all major podcast platforms. Try out listening to one of our podcasts by clicking here.
Subscribe to our Mondoro Company Limited YouTube Channel with great videos and information by clicking here.
Related Content
How To Blend In Procreate – Using Procreate App
One of the features of Procreate is blending. The blending feature combines two or more colors or shades to create a smooth transition between them. It is a fundamental technique that can be used in various ways, from creating gradients to adding shading and texture to your artwork. In Procreate, blending is a powerful tool that can help you create stunning and realistic digital artwork.
You can discover more by reading How To Blend In Procreate – Using Procreate App by clicking here.
The Power Of The Procreate Eyedropper Tool
The Procreate Eyedropper Tool is a valuable asset that enables artists and designers to extract and utilize colors from various sources effortlessly. Read on as we will delve into the power of the Procreate Eyedropper Tool, exploring ten innovative ways to incorporate it into your design workflow. Let’s embark on this colorful journey together!
To learn more about The Power Of The Procreate Eyedropper Tool by clicking this link.
How To Copy And Paste In Procreate?
Copying in Procreate is known as duplicate. Procreate will duplicate your layers one on top of another. The layers you duplicate will automatically form a layer on top of the copied layers. You do not need to do an additional function to paste in Procreate, as once you duplicate the layer, it will be automatically pasted.
You can discover more by reading How To Copy And Paste In Procreate? by clicking here.